How to create a Zoezi Flex addon component!
This is a short guide on how to create a Zoezi Flex addon component that interacts with most functionality you may encounter. Wrote this a while back while working at Zoezi.
Zoezi Addon
Lets create an addon for Zoezi Flex!
API Documentation: Link
If you want to follow this guice but you do not yet have a developer account with Zoezi, please send an email to developer@zoezi.se and they will help you get started!
Frontend Code
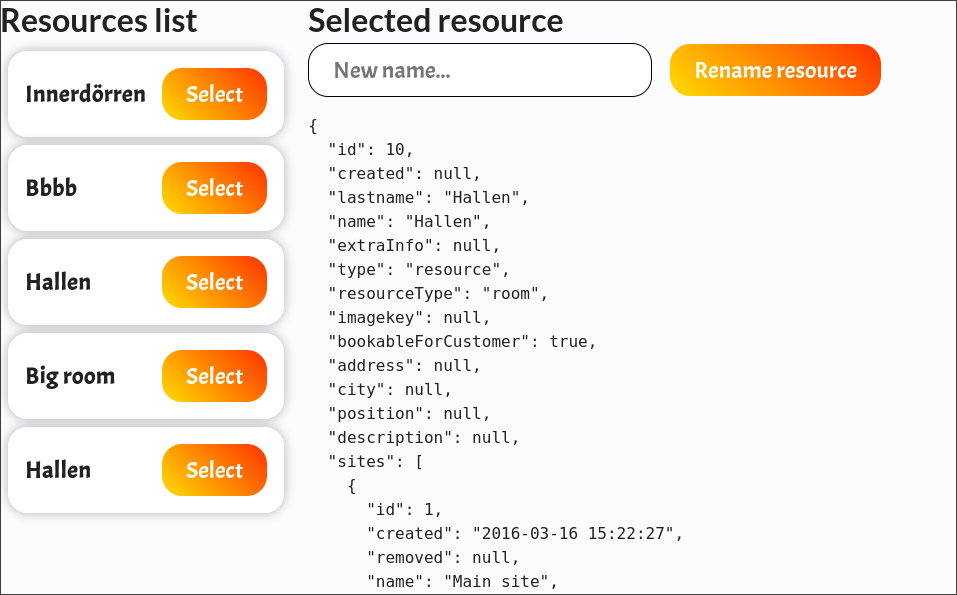
You should create a new component by pressing Ny Komponent, select Vue 2 then you should copy paste the following code to the HTML, Javascript and CSS tabs. Then press save.
HTML
<div style="display: flex;">
    <div>
        <h1>Resources list</h1>
        <template v-for="resource in resources">
            <div class="card">
                <h2 style="padding: 0; margin: 0; margin-right: 1rem;">{{resource.lastname}}</h2>
                <button class="button" @click="selectResource(resource)">
                    Select
                </button>
            </div>
        </template>
    </div>
    <div v-if="selected" style="margin-left: 1rem;">
        <h1>Selected resource</h1>
        <div style="margin-bottom: 1rem;">
            <input class="input" v-model="renameValue" placeholder="New name..." />
            <button class="button" @click="renameSelectedResource">Rename resource</button>
        </div>
        <pre>{{selected}}</pre>
    </div>
</div>
JS
export default {
    zoezi: {
        icon: 'mdi-account'
    },
    props: {
        // Props that are defined like this
        // are editable in the homepage editor.
        resourceCount: {
            title: 'Display count',
            type: Number,
            default: 5
        }
    },
    data() {
        return {
            resources: [],
            selected: null,
            renameValue: ""
        }
    },
    methods: {
        getResources() {
            // /api/<your addon uuid>/<api url>
            window.$zoeziapi.get("/api/df080855b38974a5/resources").then((res) => {
                this.resources = res.slice(0, this.resourceCount);
            })
        },
        selectResource(resource) {
            this.selected = resource;
        },
        renameSelectedResource() {
            // Create object that fits the ResourceChangeData as specified here:
            // https://developer.zoezi.se/apidoc/index.html#POST/resource/change___ResourceChangeData
            // Since we only want to change the name, we want to input all
            // required fields from the list including the lastname field
            // which we want to change. (lastname is the displayname of resources)
            const resourceChangeData = {
                id: this.selected.id, // [Required Integer] ID of the resource.
                lastname: this.renameValue, // [Required String] Our input field.
                resourceType: this.selected.resourceType, // [Required String] Since we dont want to change this we just use the value it currently has.
                sites: this.selected.sites // [Required Integer] We do not want to change this so we use the value it currently has here too.
            }
            // /api/<your addon uuid>/<api url>
            window.$zoeziapi.post("/api/df080855b38974a5/resource", { ...resourceChangeData }).then(() => { location.reload() });
        }
    },
    mounted() {
        // Load resources when the component is mounted (Standard Vue2 Options API syntax.)
        this.getResources();
    }
}
CSS
.card {
    border: 1px solid rgba(255, 255, 255, .25);
    border-radius: 20px;
    background-color: white;
    box-shadow: 0 0 10px 1px rgba(0, 0, 0, 0.25);
    backdrop-filter: blur(15px);

    padding: 1rem;
    margin: 0.5rem;

    display: flex;
    min-width: fit-content;
    justify-content: space-between;
    align-items: center;
}

.button {
    background: linear-gradient(45deg, rgb(255, 220, 0), rgb(255, 50, 0));
    width: fit-content;
    height: fit-content;
    padding: 0.5rem;
    padding-left: 1.5rem;
    padding-right: 1.5rem;
    color: white;
    border-radius: 20px;
    font-size: 1.5rem;
}
.button:hover {
    background: rgb(255, 150, 0);
}

.input {
    background: white;
    width: fit-content;
    height: fit-content;
    padding: 0.5rem;
    padding-left: 1.5rem;
    padding-right: 1.5rem;
    margin-right: 1rem;
    border-radius: 20px;
    font-size: 1.5rem;
    border: thin solid black;
}
Backend Functions
The frontend code utilizes two API calls that reference the current addon. These are the GET /resources and POST /resource endpoints. Define the functions to run when you call these API calls in the Funktioner tab.
Press Ny Funktion then give it a good name like Get Resources, select Python 3.12, then pick Mall för API then press Spara. Copy the code for the GET request below, then repeat the same for the POST request.
Get Resources (GET /get//resources)
import zoezi
import json

def main(data, context):
    zoezi.init(data['apikey'], data['hostname'])

    resources = zoezi.get("/api/resource/get")
    # For other usecases, to get a single resource with specific id:
    # resources = zoezi.get("/api/resource/get", {"id": 8})
    # Full list of parameters (and returntype) here:
    # https://developer.zoezi.se/apidoc/index.html#GET/resource/get

    return resources
Post Resource (POST /api//resource)
import zoezi
import json

def main(data, context):
    zoezi.init(data['apikey'], data['hostname'])

    resource = data['params'].get('resource')
    if not resource:
        raise Exception('Missing parameter: resource')

    res = zoezi.post('/api/resource/change', json=resource)
    return json.dumps({'result': res})
Defining API Endpoints
You are almost done! The only thing left is to define the API endpoints that are going to call our newly made functions.
- Go to the
API:ertab - Press
Nytt API - Give the API endpoint a meaningful name.
- Select the path, for example
/resourcesfor theGETAPI and/resourcefor thePOSTAPI. - Assign the HTTP method to run,
GETfor theGET /resourcesAPI andPOSTfor thePOST /resourceAPI. - Assign the function to run, here you will see the functions you defined before.
- Give it a good description that will show up in the API documentation.
- The
GETrequest does not require any parameters. So you can pressSparato finish setting it up. - For the
POSTrequest we need to add a parameter, clickNy Parameter, name itresource, provide a good description, selectObligatoriskto force the user to send it for the API to respond with a result. Then selectTypasJSONand pressSparato finish setting it up. - Finally press
Sparato finish setting it up.
Using the Addon
You have now successfully set up an API endpoint and a component for the frontend, you can now add it to your Zoezi Flex website!
- Log in to your staffpage, going to addon
.zoezi.se/staff - Go go to the
Tillvalsbutikin the left hand menu. - Search for your addon and select it.
- Press
Lägg till - Navigate to the root of the homepage at addon
.zoezi.se/ - Press the cogwheel at the bottom left corner.
- Add a new row, add the component you just made to the page.
- You should now see the component render to the page and it should let you change the name of one of the resources after you select it!
Conclusion
Congratulations! You now have a zoezi addon! For this addon to show up for everyone using the zoezi system send it for review in your developer portal. After the zoezi team has had a look at it it will be made available for everyone to use!
Thanks for reading!